When your container arrives, reaching for a hammer instead of the correct bolt cutters is a critical mistake, as that simple, impulsive act can cause injury, damage the container, and destroy the very evidence the seal was designed to protect as part of a final verification.
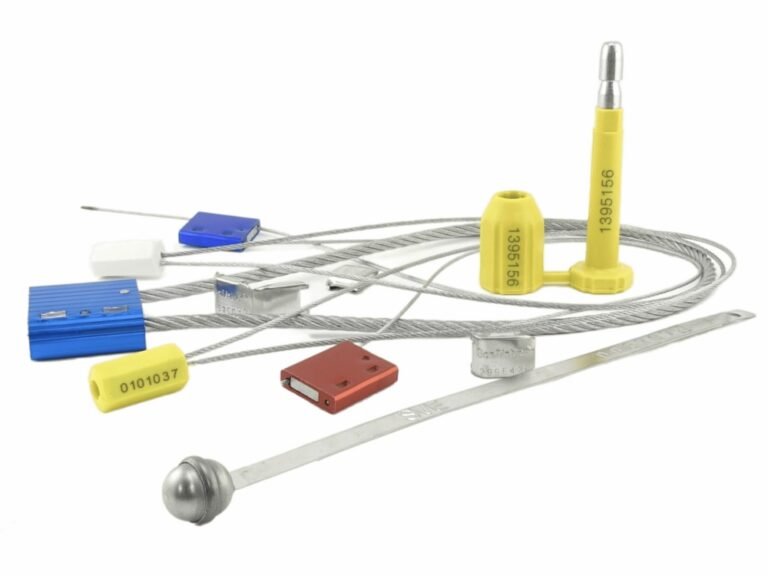
To remove a bolt seal, you must use a pair of high-quality bolt cutters (at least 24 inches long) and wear safety glasses. The process involves inspecting the seal's number and integrity, making a clean cut through the steel pin, and then retaining both pieces for verification and proper disposal.

I always emphasize to my clients that removing a bolt seal is not the end of the security chain; it is the final, crucial "validation" link. The purpose of this act isn't to "break a lock" but to "complete a security audit." Every single step, from visually inspecting the seal before you cut to how you handle the two pieces afterward, is about providing the final, undeniable evidence of that cargo's integrity throughout its journey. Let's walk through this process correctly.
Before You Start: Why a Special Tool is Non-Negotiable?
You see the thick steel pin and think a hammer or a pry bar will do the job. Why hunt for bolt cutters?
Because those tools are designed for destruction, not for a clean removal. Using anything other than bolt cutters is dangerous and fundamentally misunderstands the seal's purpose as a forensic tool.

The entire design of a high-security bolt seal is based on the premise that it can only be removed by a specific method: shearing. When I was a QC inspector, I saw firsthand what happens when people try other methods.
Why Only Bolt Cutters Work:
- Forensic Integrity: A high-security seal is a piece of evidence. Its job is to show signs of tampering. A hammer blow can create impact marks that mimic tampering attempts, muddying the waters and making it impossible to perform a clear audit. Bolt cutters make a clean, predictable cut that preserves the seal's body for inspection.
- Safety: Bolt seals are made of hardened steel. Striking one with a hammer can cause it to shatter, sending sharp metal fragments flying at high velocity. This poses a serious risk of eye injury.
- Preventing Damage: Trying to pry a seal off with a crowbar can warp or break the container's locking hardware, leading to costly repairs. A clean snip with bolt cutters isolates the force on the seal's pin, protecting the container itself. The goal is to remove the seal, not to vandalize the door.
Your Essential Gear: Safety Glasses and Bolt Cutters
You're ready to do this the right way. What exactly do you need to have in hand?
This isn't a job that requires a huge toolkit. You only need two essential items: proper eye protection and a pair of sufficiently large bolt cutters.

The simplicity here is deceiving; having the right versions of these tools is what matters. In my experience, skimping on either of these items is where things go wrong. This is about professionalism and adherence to basic workplace safety standards.
| Gear | Specification | Why It's Critical |
|---|---|---|
| Safety Glasses | Must be ANSI Z87.1 rated or equivalent. | Even with bolt cutters, the pin can release with significant force. Proper safety glasses protect your eyes from the pin or any small fragments. This is not optional. |
| Bolt Cutters | Minimum 24 inches (600mm) long. 36 inches (900mm) is even better. | The long handles provide the necessary leverage to cut through hardened steel with minimal effort. Using smaller cutters requires immense force, increasing the risk of the tool slipping and causing injury. |
Getting the right gear is the first step in treating this process like the professional security procedure it is.
The 4-Step Process for Safe Bolt Seal Removal
You have your safety glasses and your bolt cutters. What are the exact steps to follow?
The process is a deliberate, four-step security protocol: Inspect, Position, Cut, and Secure. Following these steps in order ensures both safety and the integrity of your security audit.
This is the core of the "security audit." Each step is a checkpoint. I train teams to perform this sequence without deviation, turning it into muscle memory.
Step 1: INSPECT (The Pre-Audit)
Before your cutters even touch the seal, stop. Check that the seal's serial number exactly matches the number on the shipping documents (Bill of Lading
, etc.). Look for any signs of tampering—unusual marks, glue, or scratches on the pin or body. If anything is suspicious, STOP. Document the issue with photos and notify your supervisor immediately.
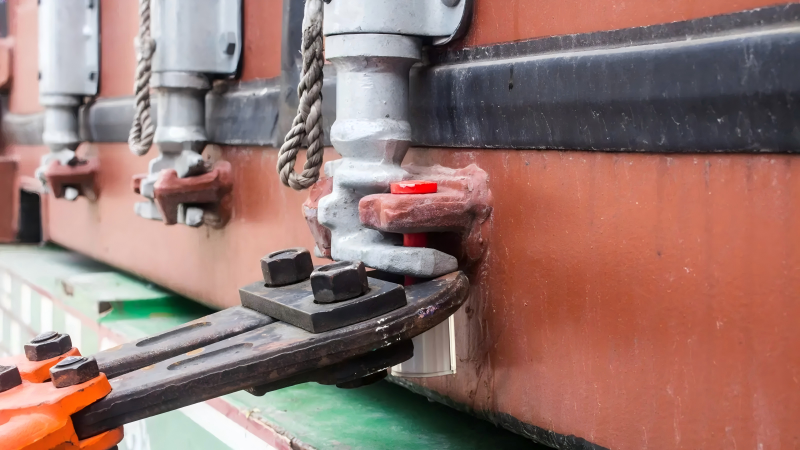
Step 2: POSITION (Safe Stance)
Put on your safety glasses. Get a firm footing and a good grip on the bolt cutters. Position the cutter jaws around the middle of the steel pin. Ensure no one is standing directly in front of the seal.
Step 3: CUT (The Action)
Apply firm, steady pressure to the handles. The pin should snap with a clean break. Do not use a rocking motion. The goal is one single, decisive cut.
Step 4: SECURE (Post-Audit)
Carefully remove both parts of the broken seal—the pin and the body. These are your final pieces of evidence.
After the Seal is Removed: The Critical Steps of Verification and Disposal
The seal is cut. Are you done? No. The final audit steps are just as important as the removal itself.
Once the seal is cut, you must verify the pieces and then dispose of them according to your company's security policy. This prevents the seal from being stolen and used for fraudulent purposes.

What you do with the two pieces of the seal completes the audit trail. Simply tossing them on the ground is an amateur mistake that leaves a major security loophole.
- Verification: Hold both pieces of the seal. Confirm again that the serial numbers on the pin head and the body match. This is your last chance to catch a sophisticated "replica seal" attack, where a fake seal was used.
- Disposal Protocol: A used seal, even a broken one, is a security asset. It contains information about your numbering sequence. Never leave it lying around. Your company should have a clear policy for secure disposal. This often means placing both parts in a designated, secure container to be collected and destroyed, preventing them from being analyzed or copied by thieves.
Common Mistakes and Dangerous Actions to Avoid
What are the most common ways people get this simple process wrong?
The biggest mistakes come from impatience and a lack of respect for the process. Using the wrong tools, not wearing safety gear, and improper disposal are the top three errors.

Over the years, I've heard some horror stories. These aren't just theoretical risks; they are real-world mistakes that lead to real consequences, from injuries to massive insurance claim disputes. Here are the things you must NEVER do.
- Never Use a Hammer or a Grinder: A hammer can cause dangerous metal shrapnel. An angle grinder creates sparks, a fire hazard, and heats the seal, destroying evidence of tampering.
- Never Cut Without Wearing Safety Glasses: This is non-negotiable. An eye injury can happen in a split second and is completely preventable.
- Never Neglect the Pre-Inspection: Cutting a seal without first checking its number and condition is like deleting a file without reading it. You destroy the evidence before you've even audited it.
- Never Leave a Used Seal Behind: Leaving a broken seal on the ground is like leaving a key to your house lying on the sidewalk. It gives criminals valuable information about your security protocols and numbering systems.
Conclusion
Removing a bolt seal is the final, critical act of a security audit. By using the right tools, wearing safety gear, and following a strict verification and disposal protocol, you ensure the integrity of the entire supply chain.
Complete Your Security Audit with ProtegoSeal
Security doesn't end until the cargo is in your hands. At ProtegoSeal, we provide both the high-quality, certified seals and the expert guidance to ensure your security protocols are flawless from start to finish. Contact us to reinforce every link in your security chain.